A strong concrete foundation ensures your garden shed remains level, stable, and protected from shifting soil or moisture, extending its lifespan significantly. Ideal for Norfolk’s variable weather and ground conditions, this base supports heavy storage while complying with UK building standards.
Professionals like HM Groundworks, with 15 years in groundworks, offer reliable solutions from consultation to completion, emphasizing quality and customer satisfaction.
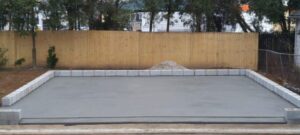
Why Choose a Concrete Foundation for Your Shed
Concrete bases outperform gravel or timber in durability, resisting rot, pests, and frost heave common in UK gardens. They provide a flat, solid platform for sheds up to 15×10 feet, preventing door misalignment or floor sagging over time. For how to build a shed base, concrete distributes weight evenly, ideal for tools, bikes, or workshops.
In renovations or new setups, this foundation integrates seamlessly with extensions. Local firms such as construction companies Norfolk handle site-specific challenges like clay soils, ensuring long-term stability without jargon.
Planning Your Shed Foundation Project
Selecting the Location and Size
Choose a flat, well-drained spot away from trees to avoid root interference, ideally 1-2 feet larger than your shed for overhang. For a 10×8 shed, aim for a 12×10 base to allow ventilation and access. Check local council rules, sheds under 2.5m high often skip permits, but confirm utilities underground first.
Measure diagonally to ensure squareness; equal lengths confirm right angles. Slope the site slightly for runoff if needed.
Calculating Materials and Costs
A standard 100mm thick slab for an 8×6 shed requires about 0.5 cubic meters of C20 concrete, plus hardcore and mesh. Concrete foundation for shed cost averages £75-£110 per m³ for materials, with labor at £220-£450 per day for pros, total £300-£600 for small bases.
Add 10% extra concrete for waste. DIY saves but demands tools like mixers; pros prevent errors.
Site Preparation Essentials
Clearing and Excavating the Ground
Mark the perimeter with stakes and string, then remove turf, weeds, and topsoil to 150-200mm depth, 75mm for hardcore, 75-100mm for concrete. Compact the soil with a tamper or plate compactor to form a firm sub-base, eliminating voids that cause cracks.
In Norfolk’s damp climate, ensure positive drainage by grading away from the house. Remove sharp debris to protect membranes.
Laying the Sub-Base Layer
Fill with 75-100mm MOT Type 1 hardcore, wetting and compacting in layers for stability. Top with 25-50mm sharp sand to cushion the damp-proof membrane (DPM), preventing punctures during pour.
This drainage layer handles rainwater, crucial for shed longevity.
Building the Formwork and Reinforcement
Constructing Sturdy Formwork
Use 150mm x 25mm treated timber for forms, cut to size and nailed into a frame. Drive stakes every 1m outside, securing with screws or nails, and level with a spirit level across the top. Brace diagonals for rigidity against wet concrete pressure.
For DIY shed slab guide, ensure forms are plumb and overfilled slightly for screeding.
Adding Reinforcement for Strength
Lay A142 steel mesh 50mm above the base on plastic chairs or blocks, overlapping joints by 300mm and wiring secure. This prevents cracking from temperature changes or loads. Mist mesh lightly before pouring to aid bonding.
Skip for tiny sheds, but essential for anything over 4m².
Pouring and Finishing the Concrete
Mixing, Pouring, and Screeding
Mix C20 concrete to a slump of 50-100mm, use a mixer for consistency like thick porridge. Pour from one corner, spreading with rakes to fill forms, vibrating or rodding to eliminate air pockets around reinforcement.
Screed level by dragging a straight 2×4 board saw-style across forms, filling lows and removing highs. Overfill first for evenness.
Finishing and Edging the Surface
Float with a bull float for smoothness, then edge corners with a groover for crack control. Trowel for final finish, adding broom texture for grip if storing vehicles. Work quickly in dry weather.
Curing Process and Aftercare
Cover with polythene or damp hessian for 7-14 days, misting daily to retain moisture, full strength hits at 28 days. No foot traffic for 48 hours, heavy loads after two weeks.
Seal after curing for stain resistance. Inspect for hairline cracks, filling with mortar if needed.
Common Pitfalls in DIY Shed Foundations
Poor compaction leads to settling; always double-ram layers. Ignoring weather causes rapid drying, avoid pours below 5°C or in rain. Weak mixes from excess water weaken slabs; measure precisely.
Oversized forms without bracing bow under pressure. Test levels obsessively.
When to Hire Laying Concrete Foundation for Shed Professionals
DIY suits small sheds, but larger or sloped sites demand experts like HM Groundworks for precision equipment and compliance. Clients praise their quick quotes, problem-solving, and high finishes, from gardens to full groundworks.
They manage consultations, kick-offs, and handovers seamlessly, saving time and avoiding costly redo’s. In this way you consider hiring professionals for laying concrete foundation for shed.
Cost Breakdown and Value Tips
| Shed Size | Concrete (m³) Cost | Total DIY Cost | Pro Labor Add-On |
| 4x6m | £40-£60 | £150-£250 | £200-£300 |
| 6x8m | £80-£120 | £300-£450 | £400-£600 |
| 8x10m | £150-£200 | £500-£700 | £600-£900 |
Shop aggregates locally; ready-mix cuts mixing labor. Pros offer warranties, justifying premiums.
A robust concrete foundation secures your garden shed against elements, maximizing utility. Whether DIY via this DIY shed slab guide or pros, prioritize preparation for enduring results. Transform your space today.